Saturday, August 30, 2008
While I was out....
A Hurricane came to town last weekend.

My mom and I were taking a quick trip to Tennessee to see family last weekend, so "no problem, put away the potential projectiles in the yard and let's go!" OK, the monster felines were a little less thrilled to go and hang out with my dad, to the degree that one hid for an hour! But the cats were captured and delivered and the first raindrops fell as we finished loading up the vehicle.

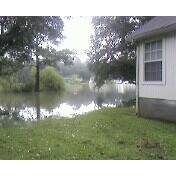
Saturday we visited with family and then went in search of stitchery and yarn shops. At the second shop, my cell rang, but I was distracted by yarn so I ignored it. Walking to the car, I checked the phone and it was my neighbor telling me that our neighborhood had gotten a ridiculous amount of rain and the lake had overflowed. So I pretty much speed to the hotel to turn on the weather channel and there are reports of them evacuating a neighborhood in my town!! One good friend volunteered to go check out my house and this is one of the pics she sent me from my neighbor's driveway at about 8 pm Saturday night:

2

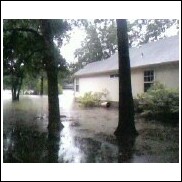
The rain had pretty much stopped, but more was expected that evening, in total I think we got about 20 inches over 2 days. So I tried to be calm about it, that's what insurance is for right? It wasn't like I had left the animals there. It's just stuff. But it was all I could think about. The fact that my mother kept staring at me trying to figure out if I was ok, didn't help much either.

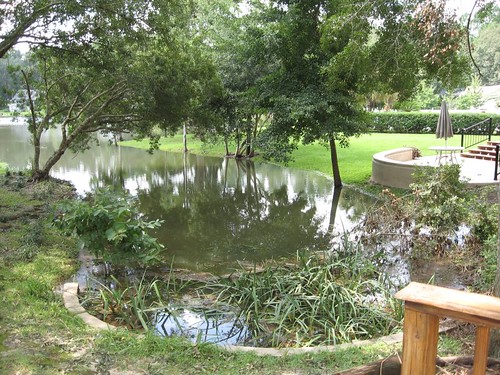
So in the morning, we dispatched my dad over there to turn off the AC (assuming the power had been restored) and check for water. He reported no water and the AC looked fine, the water had receded but there was a fair amount of lake garbage around it. My friend also popped over to the house and sent me this picture:

morning

Much better!!

When we got home, most of the overflow had drained off. The yard around the sides of my house have an inch or two of lake "muck" (for lack of a better term) and miscellaneous trash that washed up. About half of the backyard was still squishy and the inlet (that my neighbor mowed last Thursday!) was very full:

IMG_0204

Over the last few days, I picked up some branches until my back gave out and my mom loaned me her yardman to do cleanup on the side yards. Today, my yard-mowing crew showed up today to edge and mow. So, if you ignore the overfull inlet and the very edge of the yard that could not be mowed or weed-whacked, my yard looks wonderful!!! (and very, very green!)

Knitting content tomorrow!


Tuesday, August 19, 2008
Where was I?
Where the heck did August go? I made a appointment to do a warranty repair on the Pilot for next week - the end of the month!!! Craziness!

I measured my swatch (ok, I had several people measure my swatch) and I don't get gauge! I need to go up at least one needle size this time, as opposed to the 2 needle sizes I had to drop down to start the Peacock!!! Obviously my gauge is out of control. Continuing carpal issues are not helping, I just don't seem to have the desire to knit these days. I can't decide if it is the projects I have or if it is me!

In the weaving department, I have about 6 inches of waffle weave done. I will probably go a little further and then change the pattern some. But again, energy is lacking as well.

More soon after a nap!!!


Monday, August 11, 2008
Diary of a Weaving Project, Part 3
So with the heddles threaded and the reed sleyed, I can finally place the reed in the beater:

IMG_0200

The threads are tied in groups of 14 threads each. The last step for preparing the warp is to tie it to the front apron rod. There are a couple of ways to do that, such as tying the warp on directly or lashing the warp to the rod. I learned a new way to do this at a workshop in February, using ribbons to tension each group of threads.

IMG_0201

Final step is to tie up the harnesses in the pattern that I need. The harnesses are attached to treadles, so multiple harnesses can be lifted by pressing one treadle. They are tied by inserting the harness cord into a slot on the correct treadle.

IMG_0202

The final step is to spread the warp out and I'm now ready to go!!

IMG_0203

Hope that was clearer than mud! On to weaving!


Diary of a Weaving Project, Part 2
So here we are with our project on the back beam.

IMG_0177

The warp was constructed with a cross, which helps keep the threads in order. The cross is held on the warping board by ties, but once on the loom, lease sticks are used to keep the cross open.

IMG_0181

After the lease sticks are inserted, they are tied up so they hang one above the other.

IMG_0182

What you see above is the view from the back of the loom; the warp comes up from around the back beam, through the lease sticks, and in between the harnesses on the loom. My baby wolf is an eight harness loom, which means that there are 8 frames that lift the warp threads up and down. On each frame, there are heddles, made of metal (such as on my baby wolf) or of polyester cord.

I selected a point twill threading, which means that I will need a heddle on harness 1, then a heddle on harness 2, then harness 3, and so on up to harness 8. Then harness 7, harness 6, and so on through harness 2. That threading will continue all the way across.

IMG_0184

This is done with a heddle hook! After all of the heddles are threaded, it is time to sley the reed!!! I set up sticks to allow me to lay the reed down flat, which is easier for me to work with than if it is upright in the beater. If you remember in the first post, I decided to thread the warp 24 ends per inch. So I'm using my 12-dent reed (which means 12 slots/dents per inch) and thread 2 ends in each dent.

IMG_0198

Next up, tying the warp to the front beam and tying up the harnesses!

Labels:


Sunday, August 10, 2008
Diary of a Weaving Project, Part 1
A couple of weaving projects have been on my mind the last couple of weeks. I set my project plans on hold though, when I realized I had only unthreaded my mistake-ridden warp was still on the loom. I think there are about 10 yards left on it, so I decided that it would make the perfect project to try to answer a friend's question of how long it would take to make a dishcloth.

I really couldn't answer her question because weaving one would not be cost effective to me and mainly because I drag my set up time out. In my experience, weaving is pretty much the opposite of knitting:

Knitting = small set up, lots of actual knitting.
Weaving = lots of set up, less time actually weaving.

So I thought I would try to break it down. Since I'm using a project already on the back beam of the loom, I have no pictures for this post, but will add them as I can.

OK, my post reads a little strange, so I'm editing to try to clarify. Hopefully I don't make it worse!!! First the technique, then the process!

Weaving is defined by wikipedia as a textile art in which two distinct sets of threads (called the warp and weft) are interlaced with each other to form a fabric or cloth. The warp threads run lengthways of the piece of cloth, and the weft runs across from side to side.

A loom can be used to control the warp threads, by keeping them parallel and in order, the warp is stored on the loom on the warp beam.

To keep the warp threads in order and parallel, they are threaded through things called heddles. These heddles are contained in harnesses or shafts.

To make cloth, a harness (or harnesses) are lifted as the weft is placed (usually with a shuttle of some kind) between the lifted threads and the nonlifted threads. The lifting of harnesses can be controlled by foot treadles (on a floor loom) or by levers at the top or side of the loom(for a table loom). Looms can have two or more harnesses (that's another discussion!).

Spacing of the weft threads is determined by "beating" the weft threads to other weft threads, making cloth. In a loom, the beater is comprised of a reed and a mechanism to hold the reed. The reed has slots to space the warp threads. As cloth is created, the warp is advanced, so that the cloth rolls onto the cloth beam.

So, to sum up, the warp runs from the warp beam, through heddles in harnesses, through the reed, to be stored as cloth on the cloth beam.


Planning the warp is the first task - what you want to make, what size you need it to be, and what yarns you want to use. The size of the warp is based on all of those factors. To some degree, you can change what you are going to do after you set up, but not by much.

So let's make a table runner, say 9 inches wide by 6 feet long. The warp itself is not fully usable, as there is a certain amount of warp at the beginning and end that you can't weave on. So I would add on another yard to account for that waste, to require a total of 3 yards for the length. Now it's time to calculate the number of warp threads.

The type of yarn that I am using is 10/2 cotton, which has to be sett at about 24-28 ends per inch. I am going to go with 24 to give it more drape. Adding another inch to the width to assume some kind of shrinkage gives me 10 inches in width. 10 inches x 24 ends per inch = 240 ends, which means I need to wind a warp of 240 ends that is 3 yards long.

Once that is wound, the warp is looped around an apron rod, which is attached to the back beam. The warp has to be spread out before being loaded onto the loom, so I use a thing called a raddle. Once the threads are spread across the raddle, the warp is wound onto the back beam under tension.

Labels:


Sunday, August 03, 2008
Update
The LYS had a big sale the other week, I got some really great yarn!

IMG_0194

Clockwise, from bottom right: louet euroflax, Blue Heron soft twist wool, Blue Heron silk, mountain colors winter lace, cherry tree hill brushed mohair, and a bunch of sock yarn(?). I also picked up some rowan calmer to do Hey Teach. I love this color!

IMG_0178

I finished my swatch but still need to wash and measure it. I also won a door prize, this is what I got! Its Tilli Thomas beaded silk in a delicious purple color.

IMG_0179
IMG_0180

In other news, I finished my series of Christmas in July classes. They were a lot of fun, though the sheep did not enjoy the waiting time in the shop. He was so soft and squishy, he really did not hold up well. So I took him apart and reassembled him - now he's good as new!!!

IMG_0193

In house news, I planned to lay fairly low this weekend as my back is just killing me. But the plan my mother and I hatched to deal with the wash out that I am getting around some of the trees in the backyard is pretty much a failure. I am so irritated about it, I can't even begin to describe it. But let's just leave it with the fact that I have a lot of yardwork to do tonight when the sun goes down a little.


footer2.JPG